Tiramisu Cheesecake Layers with Creamy Coffee Flavor
Introduction
Why choose between tiramisu and cheesecake when you can have both? These Tiramisu Cheesecake Layers deliver the elegance and luscious bite of a classic Italian tiramisu, layered with the velvety richness of a cheesecake—all wrapped in intoxicating coffee flavors. This show-stopping dessert is the answer for anyone seeking a wow factor at special occasions, holidays, or any time you want to treat yourself and loved ones to a dreamy medley of textures and flavors.
What Makes Tiramisu Cheesecake Layers Unbeatable?
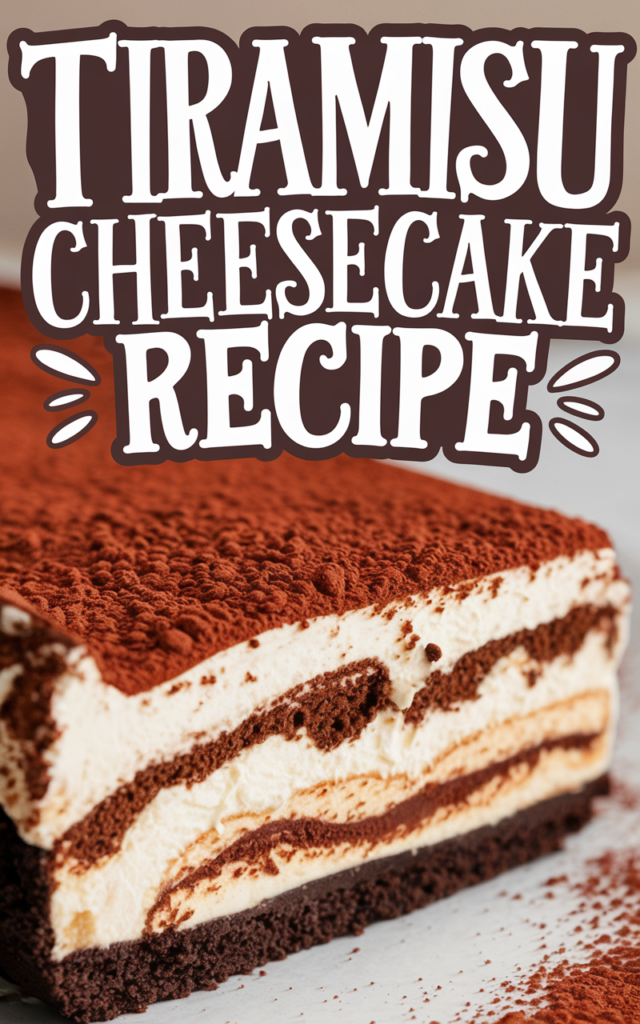
The secret to this decadent dessert lies in its harmony of flavors: a base of espresso-soaked ladyfingers, ultra-smooth cheesecake filling, and a dusting of cocoa that beckons you to take just one more bite. Each layer offers its own textural delight—from the gentle bite of the biscuits to the creamy middle and the slightly bitter finish of coffee and cocoa. It’s a treat designed to thrill both tiramisu traditionalists and cheesecake enthusiasts.
The Creamiest Coffee-Infused Cheesecake Layer
To achieve a perfectly creamy texture, it’s crucial to use room temperature ingredients and blend them fully. A powerful and reliable blender such as the Ninja BL610 Professional 72 Oz Countertop Blender, Black ensures your filling is as smooth as silk with no lumps. Incorporating a shot of quality espresso and a touch of Kahlúa or coffee liqueur heightens the dessert’s authentic Italian flair.
Building Flawless Tiramisu Cheesecake Layers
Start by preparing your springform pan with a lining of Reynolds Kitchens Brown Parchment Paper Roll, making it much easier to release your masterpiece without a hitch. Layer espresso-dipped ladyfingers as your base, then follow with that dreamy cheesecake mixture. For even and consistent layers, using a Lifewit Silverware Drawer Organizer, Expandable, Large, Black to keep your utensils at hand makes assembly swift and seamless.
After baking and cooling, dust generously with high-quality cocoa powder. For slicing perfection and neat presentation, a sharp chef’s knife or a set of KitchenAid All Purpose Kitchen Shears with Protective Sheath, Black is invaluable for prepping garnishes like chocolate curls or fresh berries.
Serving Suggestions for Tiramisu Cheesecake Layers with Creamy Coffee Flavor
To elevate your presentation, serve each slice dusted with a little extra cocoa or shaved chocolate. Pair with a shot of espresso or a chilled glass of dessert wine for an indulgent finish. Portion leftovers into Rubbermaid Brilliance Food Storage Containers, Set of 5 (3.2 Cup) to maintain their ideal texture and flavor.
This dessert is a guaranteed conversation starter and crowd-pleaser for any gathering, thanks to its impressive appearance and irresistible taste.
Nutritional Information and Serving Size
This recipe yields approximately 12 generous slices. Depending on variations and specific brands of ingredients, each serving is estimated to contain 350–425 calories. Tiramisu Cheesecake Layers are best enjoyed on special occasions as a memorable centerpiece.
Tiramisu Cheesecake Layers Recap
Combining the iconic flavors of tiramisu and cheesecake, this dessert delivers creamy coffee notes, an irresistible layered texture, and a visually striking finish. It’s sure to impress guests and satisfy any sweet tooth craving with sophistication.
Ingredients
Instructions
- Preheat your oven to 325°F. Line the bottom of a 9-inch springform pan with a round of Reynolds Kitchens Brown Parchment Paper Roll for easy release.
- Mix together the cooled espresso and Kahlúa (if using) in a shallow dish. Quickly dip each ladyfinger in the mixture—do not soak—and arrange a layer of dipped ladyfingers across the pan bottom.
- In a large bowl or a Ninja BL610 Professional 72 Oz Countertop Blender, Black, blend the cream cheese and sugar until completely smooth. Add eggs one at a time, blending well after each addition. Incorporate sour cream, heavy cream, vanilla extract, and salt until fully combined and luscious.
- Pour half the cheesecake filling over the ladyfinger layer, smoothing with a spatula. Add a second layer of dipped ladyfingers, then top with the remaining cheesecake filling. Tap the pan gently to remove air bubbles.
- Bake for 55–65 minutes, or until the edges are set and the center still jiggles slightly. Cool on a rack, then refrigerate uncovered for at least 6 hours or overnight.
- Release from the pan. Dust the top generously with cocoa powder and, if desired, garnish with chocolate curls or berries. For precise and clean slices, run a sharp knife or KitchenAid All Purpose Kitchen Shears with Protective Sheath, Black under hot water between cuts.
- Store leftovers in Rubbermaid Brilliance Food Storage Containers, Set of 5 (3.2 Cup) and refrigerate for up to 4 days.
Cook and Prep Times
Prep Time: 30 minutes
Cook Time: 60 minutes
Total Time: About 7 hours (including chilling time)