Best New York Cheesecake Recipe
Introduction
If you’re searching for the ultimate crowd-pleasing dessert, a New York cheesecake is a timeless classic that never fails to impress. Known for its ultra-rich, creamy interior and distinctively dense texture atop a crisp graham cracker crust, this legendary cake offers pure indulgence in every bite. Whether you’re hosting a celebration or simply craving a decadent treat, this cheesecake recipe stands tall—literally and figuratively—among the world’s greatest desserts.
The Art of New York Cheesecake
What sets an authentic New York cheesecake apart is its silky smoothness, achieved by blending high-quality cream cheese, just the right amount of sugar, and a splash of cream, all atop a buttery, sweet crust. The result is a harmonious marriage of tang, sweetness, and richness. Baked in a water bath, the cake comes out sumptuously moist, with an elegant, uncracked top that’s ready for fruit, sauce, or simply a dusting of sugar.
Building the Dreamy Crust
For a sturdy crust that perfectly offsets the luscious filling, start by crushing graham crackers to a fine crumb. For superior consistency when crushing, use a Ninja BL610 Professional 72 Oz Countertop Blender, Black—it ensures your crumbs are perfect every time. After mixing with melted butter and a pinch of sugar, line your springform pan with a sheet from the Reynolds Kitchens Brown Parchment Paper Roll for easy removal and cleanup.
The Creamy Filling: Perfection in a Batter
Room-temperature ingredients are the secret to a lump-free filling. Use a digital scale like the Amazon Basics Digital Kitchen Scale with LCD Display, Black and Stainless Steel to measure out your cream cheese and sugar precisely—this attention to detail is what elevates your cheesecake from good to truly great. Unlike lighter varieties, this batter is intentionally thick and creamy, achieved through careful mixing and top-quality dairy.
Mastering the Bake: Water Bath Essentials
Baking the cheesecake in a water bath is crucial to prevent cracking and ensure a smooth, creamy texture. For safe and confident handling when removing your cheesecake from the oven, rely on the KitchenAid Ribbed Soft Silicone Oven Mitt Set, Milkshake, 2 Count—protect your hands and your masterpiece during this step.
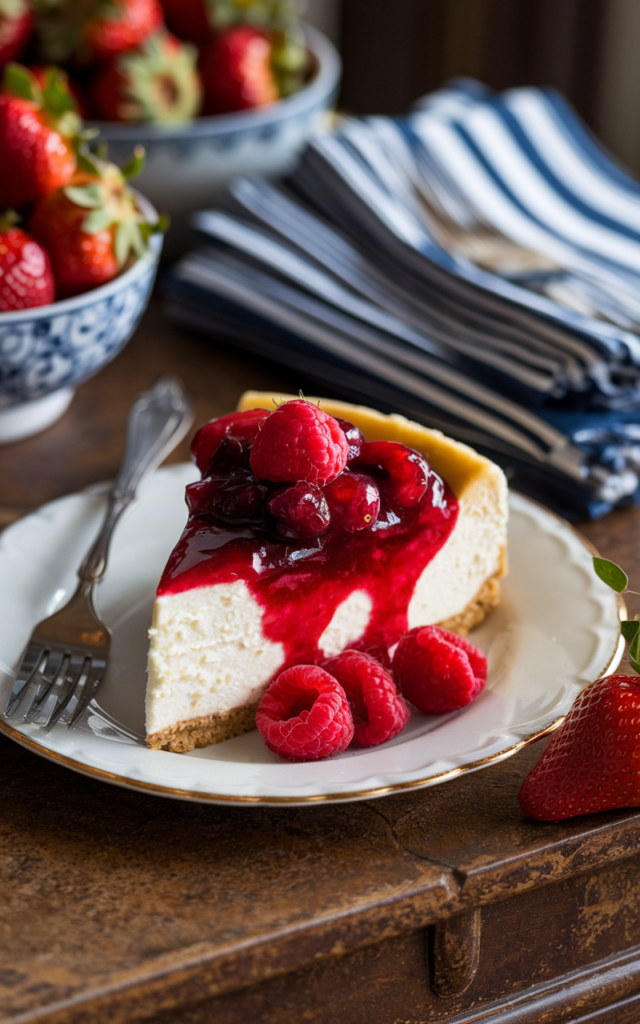
Serving, Storing, and Garnishing Tips
Chill your cheesecake overnight to allow it to fully set and for the flavors to meld together. When ready to serve, garnish with fresh berries, a swipe of whipped cream, or a drizzle of tangy fruit sauce. If there are leftovers, use Rubbermaid Brilliance Food Storage Containers, Set of 5 (3.2 Cup) to keep slices fresh for up to a week in the refrigerator or freeze them for longer enjoyment.
Nutritional Information and Serving Size
This recipe yields one 9-inch cheesecake, serving about 12 generous slices. Each slice contains approximately 420–480 calories (varies based on toppings), making this a celebratory dessert best savored in moderation.
[h2]Ingredients[/h2]
Ingredients
Instructions
- Preheat your oven to 325°F (163°C). Lightly grease a 9-inch springform pan and line the bottom with Reynolds Kitchens Brown Parchment Paper Roll for easy removal.
- For the crust: In a bowl, mix graham cracker crumbs (use the Ninja BL610 Professional 72 Oz Countertop Blender, Black for perfect texture), sugar, and melted butter until evenly combined. Press firmly into the bottom and slightly up the sides of your prepared pan. Bake for 10 minutes, then set aside to cool.
- For the filling: In a large bowl, beat cream cheese until smooth and creamy. Gradually add sugar and continue mixing until fully incorporated and fluffy.
- Blend in sour cream, heavy cream, and vanilla extract. Beat in the eggs, one at a time, just until incorporated (do not overmix).
- Pour the batter over the crust. Gently tap the pan on the counter to remove air bubbles.
- Set the springform pan inside a large roasting pan. Pour hot water into the roasting pan until it comes halfway up the outside of the springform pan; this water bath prevents cracking.
- Bake for 60–70 minutes, or until the outer edges are set but the center still slightly wobbles. Turn off the oven, crack the door, and let the cheesecake cool for 1 hour.
- Carefully remove the roasting pan from the oven using the KitchenAid Ribbed Soft Silicone Oven Mitt Set, Milkshake, 2 Count. Transfer the cheesecake to a rack and cool completely, then refrigerate (covered) at least 6 hours or overnight.
- For clean, even slices, use a long sharp knife dipped in hot water and wiped clean between each cut.
- Store leftovers in Rubbermaid Brilliance Food Storage Containers, Set of 5 (3.2 Cup) in the fridge for up to 1 week.
Cook and Prep Times
Prep Time: 25 minutes
Cook Time: 1 hour 10 minutes
Chill Time: 6–8 hours (preferably overnight)
Total Time: About 8–10 hours (including chilling)
Best New York Cheesecake Recipe (Recap)
With its creamy, dense filling and crisp crust, the classic New York cheesecake remains a showstopper dessert everyone loves. With the right prep tools and techniques, you’ll achieve bakery-worthy results right at home—perfect for any special occasion or simply to enjoy a slice of New York’s best.